#AJAX JavaScript code examples
Explore tagged Tumblr posts
Visit Tumblr Blog
Explore Tumblr blogs with no restrictions, modern design and the best experience.
Last Seen Tumblr Blogs


Fun Fact
The total number of visits Tumblr.com received during January 2021 is 327 million.
Text
Exploring HTMX: Revolutionizing Interactive Web Development

In the fast-paced realm of web development, new technologies are constantly emerging to enhance user experiences and streamline coding processes. HTMX is one such innovation that has gained significant attention for its ability to transform the way we build interactive web applications.
What is HTMX?
HTMX, standing for HyperText Markup eXtension, is a cutting-edge library that empowers developers to create dynamic web pages with minimal effort. It achieves this by combining the principles of AJAX (Asynchronous JavaScript and XML) and HTML, allowing developers to update parts of a webpage in real-time without the need for complex JavaScript code. HTMX Offical Site https://htmx.org/
The Power of HTMX
Seamless User Experience HTMX facilitates a seamless and fluid user experience by enabling developers to update specific portions of a webpage without triggering a full page reload. This translates to faster load times and reduced server load, enhancing overall performance. Simplified Development Workflow Gone are the days of writing extensive JavaScript code to achieve interactive features. With HTMX, developers can leverage their existing HTML skills to add dynamic behavior to their web applications. This not only streamlines the development process but also makes the codebase more maintainable and easier to understand. Accessibility Compliance In today's digital landscape, accessibility is paramount. HTMX shines in this aspect by promoting accessibility best practices. Since HTMX relies on standard HTML elements, it naturally aligns with accessibility guidelines, ensuring that web applications built with HTMX are usable by individuals with disabilities. SEO-Friendly One of the concerns with traditional single-page applications is their impact on SEO. HTMX addresses this by rendering content on the server side while still providing a dynamic and interactive frontend. This means search engines can easily crawl and index the content, contributing to better SEO performance.
How HTMX Works
HTMX operates by adding special attributes to HTML elements, known as HX attributes. These attributes define the behavior that should occur when a certain event takes place. For example, the hx-get attribute triggers a GET request to fetch new content from the server, while the hx-swap attribute updates the specified element with the retrieved content. This declarative approach eliminates the need for intricate JavaScript code and promotes a more intuitive development experience. Click Me
Getting Started with HTMX
- Installation: To begin, include the HTMX library in your project by referencing the HTMX CDN or installing it through a package manager. - Adding HX Attributes: Identify the elements you want to make dynamic and add the appropriate HX attributes. For instance, you can use hx-get to fetch data from the server when a button is clicked. - Defining Server-Side Logic: HTMX requires server-side endpoints to handle requests and return updated content. Set up these endpoints using your preferred server-side technology. - Enhancing Interactions: Leverage various HX attributes like hx-swap or hx-trigger to define how different parts of your page interact with the server. Using HTMX to enhance the interactivity of your web application involves a few simple steps: - Include HTMX Library: Begin by including the HTMX library in your project. You can do this by adding the HTMX CDN link to the section of your HTML file or by installing HTMX using a package manager like npm or yarn. htmlCopy code - Add HTMX Attributes: HTMX works by adding special attributes to your HTML elements. These attributes instruct HTMX on how to handle interactions. Some common HTMX attributes include: - hx-get: Triggers a GET request to fetch content from the server. - hx-post: Triggers a POST request to send data to the server. - hx-swap: Updates the content of an element with the fetched content. - hx-target: Specifies the element to update with the fetched content. - hx-trigger: Defines the event that triggers the HTMX action (e.g., "click"). Here's an example of how you can use the hx-get attribute to fetch content from the server when a button is clicked: htmlCopy code Fetch Data - Create Server-Side Endpoints: HTMX requires server-side endpoints to handle requests and provide data. Set up these endpoints using your preferred server-side technology (e.g., Node.js, Python, PHP). These endpoints should return the desired content in response to HTMX requests. - Use Data Attributes: HTMX also supports data attributes for passing additional information to the server. You can use attributes like data-* or hx-* to send specific data to the server when an action is triggered. - Leverage HTMX Features: HTMX offers additional features like animations, history management, and more. You can explore the documentation to discover how to implement these features according to your needs. - Test and Iterate: As with any development process, it's essential to test your HTMX-enhanced interactions thoroughly. Make sure the interactions work as expected and provide a seamless user experience. Remember that HTMX aims to simplify web development by allowing you to achieve dynamic behaviors with minimal JavaScript code. It's important to familiarize yourself with the HTMX documentation to explore its full potential and capabilities. For more detailed examples and guidance, you can refer to the official HTMX documentation at https://htmx.org/docs/.
Conclusion
In a digital landscape where speed, accessibility, and user experience are paramount, HTMX emerges as a game-changer. By combining the best of AJAX and HTML, HTMX empowers developers to create highly interactive and responsive web applications without the complexity of traditional JavaScript frameworks. As you embark on your journey with HTMX, you'll find that your development process becomes smoother, your codebase more efficient, and your user experiences more delightful than ever before. Read the full article
2 notes
·
View notes
Text
Top Ways to Send Form Data to Any REST API Instantly
In today's fast-paced digital landscape, businesses rely on real-time data to drive decisions, automate workflows, and stay competitive. One of the most common—and often overlooked—data entry points is the humble contact form. But what if you could instantly send that data to any REST API, CRM, or business tool without writing a single line of code?
In this guide, we'll break down the top ways to send form data to any REST API instantly, whether you're a marketer looking to sync leads with HubSpot, a developer integrating with a third-party service, or a startup founder automating lead routing.
Why Send Form Data to a REST API?
Forms are the gateway to lead capture, support tickets, user feedback, and countless other business operations. Traditionally, form submissions are emailed to inboxes or stored in local databases. But modern businesses need more than static email notifications—they need automation.
Benefits of Sending Form Data to an API:
✅ Instant lead routing to sales CRMs
✅ Real-time notifications in tools like Slack or Discord
✅ Dynamic updates to Google Sheets, Notion, or Airtable
✅ Task creation in platforms like Asana or Trello
✅ Workflow automation via Zapier, Make, or custom APIs
Now, let’s look at the top methods to make this happen.
1. Use a No-Code Tool Like ContactFormToAPI
If you want the fastest, most flexible way to connect a contact form to any REST API, tools like ContactFormToAPI are ideal.
How It Works:
Create an endpoint using the platform
Add a form or use your existing one (e.g., Contact Form 7, WPForms, Webflow)
Map form fields to the API request
Instantly POST data to any REST API with custom headers, tokens, or JSON payloads
Key Features:
No coding or backend setup required
Supports authentication, headers, and retries
Works with any form builder (WordPress, Framer, custom HTML, etc.)
Best For: Non-technical users, marketers, and teams needing fast setup.
2. Connect Your Form with Webhooks
Webhooks are the go-to option for real-time communication between your form and an API. Most modern form builders support webhooks.
How It Works:
Add a webhook URL to your form settings
When the form is submitted, the data is sent (usually via POST) to the API endpoint
Customize headers and payloads depending on the API spec
Supported By:
Contact Form 7 (with Flamingo or webhook add-ons)
Gravity Forms (via webhook add-on)
Typeform, Jotform, and others
Example Use Case:
Send new form submissions to a custom CRM endpoint or a third-party lead processing API.
Pros:
Native in many platforms
Flexible and fast
Secure (especially with token-based auth)
Cons:
Requires some technical knowledge to configure headers and payloads
Error handling and retry logic must be managed separately
3. Zapier or Make (Integromat) Integrations
Zapier and Make are automation platforms that bridge your form and any REST API using visual workflows.
How It Works:
Connect your form app as a trigger (e.g., Webflow form submitted)
Use HTTP modules in Zapier/Make to send the data to your desired REST API
Customize payloads, authentication, and error handling visually
Great For:
Teams already using Zapier for other automations
Integrating multiple services in a chain (e.g., form → CRM → Slack)
Pros:
Visual editor makes the setup easier
Supports delays, conditions, and filters
1000s of integrations built-in
Cons:
Monthly cost based on task volume
Latency (not always instant on free plans)
Less flexible than custom code or backend solutions
4. Use JavaScript Fetch/AJAX in the Front-End
If you're building your own form and want to send data instantly to an API, you can do it directly using JavaScript.
Sample Code:
js
CopyEdit
document.getElementById("myForm").addEventListener("submit", async function(e) {
e.preventDefault();
const formData = new FormData(this);
const data = Object.fromEntries(formData.entries());
const response = await fetch("https://api.example.com/leads", {
method: "POST",
headers: {
"Content-Type": "application/json",
"Authorization": "Bearer YOUR_API_KEY"
},
body: JSON.stringify(data)
});
const result = await response.json();
console.log(result);
});
Pros:
Full control over how data is sent
Great for SPAs or static sites
Cons:
No fallback or retry logic
Exposes API keys unless properly protected
Not suitable for non-technical users
5. Build a Serverless Function or Backend Proxy
For more secure and robust form handling, use a serverless function (e.g., AWS Lambda, Vercel, Netlify Functions) or a backend API that proxies requests.
Flow:
Front-end form submits data to your serverless function
The function processes the data and calls the third-party REST API
You can log, sanitize, validate, and authenticate safely
Pros:
Secure: keeps tokens and logic server-side
Scalable and powerful
Supports retry and error handling
Cons:
Requires development time
Hosting knowledge needed
Use Case Example:
A startup that routes leads from multiple landing pages through a backend proxy to distribute them to various API endpoints based on rules.
6. Use Built-In API Integrations from Form Builders
Some advanced form builders include direct integrations with REST APIs or offer HTTP Request functionality.
Examples:
WPForms: With Webhooks or Zapier add-ons
Forminator (WPMU Dev): Built-in webhook support and API customization
Jotform: Can send submissions to any API endpoint via webhook
Best For: Users already using these platforms who don’t need additional tools
Final Thoughts
Sending form data to a REST API instantly doesn't have to be complicated. Whether you're a solo founder, growth marketer, or developer, there’s a method that fits your stack and your skill level.
If you're looking for the easiest and most flexible way to connect forms to any API, tools like ContactFormToAPI make it incredibly simple—no code, no backend, no hassle. With the right setup, your forms can become the starting point of fully automated, efficient business workflows.
0 notes
Text
JQuery is open-source software which was first released in January 2006 and it is used most of the top visited websites. There are several books offered online which can be used by JQuery programmers to effectively use the features of the language and create plug-ins for JavaScript library. It is very easy to learn jQuery and to be proficient in the language using some of the acclaimed JQuery books. These books can also be used as a reference for advanced jQuery projects. Some of the most widely used JQuery books are listed below. (including free ebooks at the end of the post) JavaScript & jQuery: The Missing Manual The book provides a reference to create animated interactive WebPages having visual effects for web designing and collecting data from web pages in a simple way, which not only provides great information but saves a lot of our effort and time. Moreover, the language is so simple that even a nonprogrammer can understand it. The book teaches some basic ways of development in JavaScript and JQuery. The initial two parts are about JQuery and JavaScript. The third part informs about the images and navigations, and the fourth is on AJAX. In the end, the tips and tricks have been added. jQuery in Action, Second Edition The book provides expert guidance and minute details related to writing code of JQuery and JavaScript. At the outset, a number of downloadable learning tools have been added. This is a book for both novice and experienced programmers. However, there are certain JQuery codes for which the book does not provide a straightforward explanation. There are many variations of examples in AJAX. What’s more, the book helps to transverse HTML documents, render animations and handle events. jQuery Pocket Reference The book is a great help designed for the purpose of write-less-do-more. The chapters are backed by highly interesting explanations which serve as a great reference in JQuery development. It is a powerful reference book which eases the developmental process as well. It is portable, has a convenient size and provides an easy understanding of JQuery code. Additionally, it provides many examples to support the information. Developers who want to learn the language from the ground level can get all information from this book, as it provides all fundamental information related to jQuery. jQuery Cookbook: Solutions & Examples for jQuery Developers (Animal Guide) The book provides in-depth guidance about the rich web-fonts in an easy manner, providing learning patterns of 19 leading developers in jQuery to ensure convenient and high-performance UI development for websites, component development, and application development. The book is also a good source of information for newcomers in jQuery. Furthermore, it provides numerous examples which can be used for developmental purpose mainly for entry-level developers. The chapters start from the basics and cover large projects at the end. jQuery UI 1.8: The User Interface Library for jQuery The book has 14 chapters and 400 pages on JQuery. It gives easy methods of development and helps to speed up writing in JavaScript. It is highly helpful to people working in web development projects in JQuery, CSS, and JavaScript as it provides a step-by-step guide for the implementation and customization of library components, and the related resources to help the readers to learn a lot about JQuery. The example code in UI widgets section is backed by screenshots and visual help as well. The method given to design the user interface, questions related to the widgets and styling is highly revealing too. jQuery: Novice to Ninja The book offers downloadable source code from a website and there are around 200 examples of creating CSS, JS, and HTML codes. These are short files which provide information from the basics to cover the higher levels. The book offers you a few free chapters as well, providing a sneak peek into the contents of the book. +3 Bonus Free jQuery eBooks
Essential JavaScript And jQuery Design Patterns It is amazing that users can even get free books on JQuery. This book provides fantastic literature about the design pattern and it can be downloaded in ePub format and PDF formats; what’s more, the link provides you free download of this book! jQuery Fundamentals The book offers a number of chapters and code examples for the front-end developer. It gives an overview of jQuery JavaScript library and there are several code examples from basic to higher levels. There are eleven chapters in all and the examples help to strengthen your jQuery fundamentals. You can download the free book from the above link. Official jQuery Documentation The official jQuery documentation is a good starting point for you to learn jQuery. It also contains a lot of reference links for you to get to speed and find community help. The above-given list of JQuery books is some of the most widely used reference books which are designed with the purpose to make the lives of developers easy through a range of code examples and references. Check out More Recommended Books for reading Most Influential Software Books Agile Development Books Web Design Books Good HTML5 Books Recommended jQuery Books Awesome JavaScript Books
0 notes
Text
Interactive Web Application Development

Web development is no longer about just static pages. Users now expect responsive, real-time, and engaging experiences. In this post, we’ll explore how to develop interactive web applications that provide dynamic content and respond to user input instantly.
What is an Interactive Web Application?
An interactive web app is a website that responds to user actions in real time without needing to reload the entire page. Examples include:
Live chats
Form validations
Dynamic dashboards
Online games and quizzes
Social media feeds and comment systems
Key Technologies for Interactivity
HTML & CSS: Structure and style your app.
JavaScript: The core language for interactivity.
Frontend Frameworks: React, Vue.js, or Angular for building dynamic UIs.
AJAX & Fetch API: Load data without page reloads.
WebSockets: Real-time communication (e.g., chat apps, live notifications).
Backend Technologies: Node.js, Python, Ruby, or PHP for handling logic and databases.
Databases: MySQL, MongoDB, Firebase for storing and retrieving data.
1. Plan Your Application
Start by mapping out user flows and interactions. Identify:
What actions users will take (e.g., login, click, scroll)
How the app should respond (e.g., show a modal, fetch data)
What data is needed and where it comes from
2. Build a Responsive UI
Use CSS Flexbox or Grid for layout
Make it mobile-friendly with media queries
Add transitions and animations for smoother interactions
3. Add Dynamic Behavior with JavaScript
Use JavaScript or a frontend framework to:
Handle user events like clicks, inputs, and scrolls
Update content without reloading the page
Manipulate the DOM (Document Object Model)
4. Connect to a Backend
Use APIs to send and receive data from the server:
Use fetch() or axios to make HTTP requests
Implement RESTful APIs or GraphQL
Secure endpoints and handle authentication
5. Real-Time Features
For real-time functionality, use:
WebSockets: For bi-directional communication
Firebase Realtime Database or Firestore: For instant data syncing
Pusher or Socket.io: Libraries that simplify real-time integration
6. Test and Optimize
Test responsiveness on different screen sizes
Use tools like Lighthouse or WebPageTest for performance analysis
Minify and bundle JavaScript and CSS for faster loading
7. Deploy Your App
Use services like:
Vercel or Netlify for frontend hosting
Render, Heroku, or Railway for full-stack apps
GitHub Actions for CI/CD automation
Popular Use Cases of Interactive Web Apps
Interactive data dashboards
E-commerce platforms with live product updates
Educational platforms with quizzes and code editors
Project management tools like Trello or Notion
Conclusion
Interactive web applications create engaging and efficient user experiences. With a solid understanding of JavaScript, a powerful frontend framework, and modern backend tools, you can build apps that users love to interact with. Start simple, focus on clean UX, and keep improving your skills!
0 notes
Text
The Rise of Automation Applications: Revolutionizing Workflows Through Web Development
In today’s fast-paced digital landscape, automation has become a cornerstone of efficiency, enabling businesses to streamline operations, reduce costs, and enhance productivity. Automation applications, powered by advanced web development technologies, are transforming industries by handling repetitive tasks, optimizing workflows, and enabling data-driven decision-making. From backend scripting to frontend interactivity, the integration of automation into web development is reshaping how applications are built, deployed, and maintained. This article delves into the key aspects of developing automation applications, highlighting the technologies, trends, and challenges that define this rapidly evolving field.
At the core of automation applications lies the ability to eliminate manual effort and minimize human error. Server-side scripting languages like Python, Node.js, and Ruby on Rails are commonly used to automate tasks such as data processing, report generation, and system monitoring. For instance, an e-commerce platform can use cron jobs to automatically update inventory levels, generate sales reports, and send email notifications to customers. Similarly, webhooks enable real-time automation by triggering actions in response to specific events, such as processing a payment or updating a database. These automated workflows not only save time but also improve accuracy, ensuring that systems run smoothly and efficiently.
The rise of APIs (Application Programming Interfaces) has further expanded the possibilities of automation in web development. APIs allow different systems and applications to communicate with each other, enabling seamless integration and data exchange. For example, a CRM system can integrate with an email marketing platform via an API, automatically syncing customer data and triggering personalized email campaigns based on user behavior. Payment gateway APIs, such as those provided by Stripe or PayPal, automate the processing of online transactions, reducing the need for manual invoicing and reconciliation. By leveraging APIs, developers can create interconnected ecosystems that operate efficiently and cohesively.
Frontend automation is another area where web development is driving innovation. Modern JavaScript frameworks like React, Angular, and Vue.js enable developers to build dynamic, interactive web applications that respond to user inputs in real-time. Features like form autofill, input validation, and dynamic content loading automate routine tasks, enhancing the user experience and reducing the burden on users. For example, an online booking system can use AJAX (Asynchronous JavaScript and XML) to automatically update available time slots as users select dates, eliminating the need for page reloads and providing a smoother experience. These frontend automation techniques not only improve usability but also increase user engagement and satisfaction.
The integration of artificial intelligence (AI) and machine learning (ML) into web development has taken automation to new heights. AI-powered tools can automate complex decision-making processes and deliver personalized experiences at scale. For instance, an e-commerce website can use recommendation engines to analyze user behavior and suggest products tailored to individual preferences. Similarly, chatbots powered by natural language processing (NLP) can handle customer inquiries, provide support, and even process orders, reducing the workload on human agents. These technologies not only enhance efficiency but also enable businesses to deliver more value to their customers.
DevOps practices have also been revolutionized by automation, particularly in the context of continuous integration and continuous deployment (CI/CD). CI/CD pipelines automate the testing, integration, and deployment of code updates, ensuring that new features and bug fixes are delivered to users quickly and reliably. Tools like Jenkins, GitLab CI, and GitHub Actions enable developers to automate these processes, reducing the risk of human error and accelerating the development lifecycle. Additionally, containerization technologies like Docker and orchestration platforms like Kubernetes automate the deployment and scaling of applications, ensuring optimal performance even during peak usage periods.
Security is another critical area where automation is making a significant impact. Automated security tools can monitor web applications for vulnerabilities, detect suspicious activities, and respond to threats in real-time. For example, web application firewalls (WAFs) can automatically block malicious traffic, while SSL/TLS certificates can be automatically renewed to ensure secure communication. Additionally, automated penetration testing tools can identify potential security weaknesses, allowing developers to address them before they can be exploited. These automated security measures not only protect sensitive data but also help businesses comply with regulatory requirements and build trust with their users.
In conclusion, automation is transforming web development by enabling businesses to operate more efficiently, deliver better user experiences, and stay ahead in a competitive market. From backend scripting and API integration to frontend interactivity and AI-driven decision-making, automation is reshaping how applications are built and maintained. As web technologies continue to evolve, the potential for automation will only grow, paving the way for smarter, more responsive, and more secure digital ecosystems. By embracing automation, developers can unlock new levels of efficiency and innovation, driving progress and success in the digital age.
Make order from us: @Heldbcm
Our portfolio: https://www.linkedin.com/company/chimeraflow
0 notes
Text
So many Changes...
So since I last wrote a post, the game has gone through many changes. Forums updated, Profiles added, Airport added and completed. I have just continued to extend the features and improve every day... The design for the game has drastically changed. We have gone from soldiers warfare to Men of Chaos then to Zombies Of Chaos. Zombies of Chaos is probably the final name for the game and what It will be for good now... I've totally redesigned the game and I've redesigned the layout a few times... This image is of the bounty page and it shows basically what the game is going to look like:

I am insanely happy with where it's gotten to at this point. I had some help from Flubber on Discord who gave me some feedback. I'm incredibly happy as well with the login page:

Take note of the Mute button - music has been added, as recommended by Flubber >< --- I've also updated the ranking and XP/rewards and stuff from jobs. I've documented it too so when game is released i can post those somewhere so players cna read that in more detail and it'll make things easier to balance Next thing to do for the game is to extend this new layout to every page... add some sound effects for clicking buttons/typing etc. (oh and maybe for the casino).. Oh ive also redesigned the casino :D

Also the racetrack is redesigned

A bunch of other stuff too which I haven't mentioned just due to time (i need to be up in 4.5 hours ugh) then once ive extended the design from the bounty page and I've added some clicking sound effects and just tidyed up other parts of design (like designign the mute/volume control on front page) ... ill get to basically fixing up all the pages I haven't yet redesigned since a month or so ago Kills page, Hitlist, MIA... I want to get it all looking very nice. Then I also need to fix the kills page (many bugs) and fix hits (u dont get reward) and lots of other stuff once designs are all in place, im hoping development will speed up massively... for example i still need to put in admin commands (i want to leave that till last cos it might be a real pain in butt) Oh and another thing - I am probably going to have to migrate my code over from AJAX or whatevr im using over to server side Javascript with NodeJS and websockets. I've started readinga book on websockets to get me ready. If I can finish the game in its current state by end of march or sometime during april, then I'm hoping I can either release game as alpha/beta whilst at the same time migrating over to websockets.... The main reason will be to keep game secure (RN it can be easily hacked I think but im not 100% sure - ive done my best where i can to keep it proceted) and also just because it'll be heavy on server to keep using HTTP for everything (websockets is designed for this kind of project).. I will miss my 2006 web technologies, but i must adapt >< I am expecting to get this game up and running sometime in May or June by the latest. I have totally forgotten to blog but I'll try to do so at end of every day... oh and also take note of the navigation how it's seperated out into OUTPOST/Encounter/Wasteland... To understand what I've done here, think of it as the outpost is ur solo stuff (doing jobs, your inventory, arena, mash), encounter is anything were u interact with 1 other player (kills/overseas banking) and wasteland is anything where groups of players interact (squads, operations etc)... also Settings/community is seperate. so it's easier for players to see how to connect with the community etc. This seperation I done after flubber suggested that my old way was not the best. Thanks again Flubber and to everyone helping ZoC by giving feedback and play testing :)
0 notes
Text
How to Utilize jQuery's ajax() Function for Asynchronous HTTP Requests

In the dynamic world of web development, user experience is paramount. Asynchronous HTTP requests play a critical role in creating responsive applications that keep users engaged. One of the most powerful tools for achieving this in JavaScript is jQuery's ajax() function. With its straightforward syntax and robust features, jquery ajax simplifies the process of making asynchronous requests, allowing developers to fetch and send data without refreshing the entire page. In this blog, we'll explore how to effectively use the ajax() function to enhance your web applications.
Understanding jQuery's ajax() Function
At its core, the ajax() function in jQuery is a method that allows you to communicate with remote servers using the XMLHttpRequest object. This function can handle various HTTP methods like GET, POST, PUT, and DELETE, enabling you to perform CRUD (Create, Read, Update, Delete) operations efficiently.
Basic Syntax
The basic syntax for the ajax() function is as follows:
javascript
Copy code
$.ajax({ url: 'your-url-here', type: 'GET', // or 'POST', 'PUT', 'DELETE' dataType: 'json', // expected data type from server data: { key: 'value' }, // data to be sent to the server success: function(response) { // handle success }, error: function(xhr, status, error) { // handle error } });
Each parameter in the ajax() function is crucial for ensuring that your request is processed correctly. Let’s break down some of the most important options.
Key Parameters
url: The endpoint where the request is sent. It can be a relative or absolute URL.
type: Specifies the type of request, which can be GET, POST, PUT, or DELETE.
dataType: Defines the type of data expected from the server, such as JSON, XML, HTML, or script.
data: Contains data to be sent to the server, formatted as an object.
success: A callback function that runs if the request is successful, allowing you to handle the response.
error: A callback function that executes if the request fails, enabling error handling.
Making Your First AJAX Request
To illustrate how to use jQuery’s ajax() function, let’s create a simple example that fetches user data from a placeholder API. You can replace the URL with your API endpoint as needed.
javascript
Copy code
$.ajax({ url: 'https://jsonplaceholder.typicode.com/users', type: 'GET', dataType: 'json', success: function(data) { console.log(data); // Log the user data }, error: function(xhr, status, error) { console.error('Error fetching data: ', error); } });
In this example, when the request is successful, the user data will be logged to the console. You can manipulate this data to display it dynamically on your webpage.
Sending Data with AJAX
In addition to fetching data, you can also send data to the server using the POST method. Here’s how you can submit a form using jQuery’s ajax() function:
javascript
Copy code
$('#myForm').on('submit', function(event) { event.preventDefault(); // Prevent the default form submission $.ajax({ url: 'https://your-api-url.com/submit', type: 'POST', dataType: 'json', data: $(this).serialize(), // Serialize form data success: function(response) { alert('Data submitted successfully!'); }, error: function(xhr, status, error) { alert('Error submitting data: ' + error); } }); });
In this snippet, when the form is submitted, the data is sent to the specified URL without refreshing the page. The use of serialize() ensures that the form data is correctly formatted for transmission.
Benefits of Using jQuery's ajax() Function
Simplified Syntax: The ajax() function abstracts the complexity of making asynchronous requests, making it easier for developers to write and maintain code.
Cross-Browser Compatibility: jQuery handles cross-browser issues, ensuring that your AJAX requests work consistently across different environments.
Rich Features: jQuery provides many additional options, such as setting request headers, handling global AJAX events, and managing timeouts.
Cost Considerations for AJAX Development
When considering AJAX for your web application, it’s important to think about the overall development costs. Using a mobile app cost calculator can help you estimate the budget required for implementing features like AJAX, especially if you’re developing a cross-platform app. Knowing your costs in advance allows for better planning and resource allocation.
Conclusion
The ajax() function in jQuery is a powerful tool that can significantly enhance the user experience of your web applications. By enabling asynchronous communication with servers, it allows developers to create dynamic and responsive interfaces. As you delve deeper into using AJAX, you’ll discover its many advantages and how it can streamline your web development process.
Understanding the differences between AJAX vs. jQuery is also vital as you progress. While AJAX is a technique for making asynchronous requests, jQuery is a library that simplifies this process, making it more accessible to developers. By mastering these concepts, you can elevate your web applications and provide users with the seamless experiences they expect.
0 notes
Text
Selenium WebDriver Automation Testing

In today’s competitive software development landscape, ensuring the quality and functionality of web applications is critical. Automation testing has emerged as the most efficient way to verify applications across browsers and devices, and Selenium WebDriver stands out as one of the most powerful tools for this task. Its flexibility, open-source nature, and support for a wide range of programming languages have made Selenium WebDriver a favorite among developers and testers alike. In this article, we will explore the capabilities, features, and best practices of Selenium WebDriver automation testing to help you master it.
What is Selenium WebDriver?
Selenium WebDriver is a tool designed for automating the testing of web applications. It enables developers and testers to simulate user interactions with a web browser to validate whether the application performs as expected. Unlike Selenium’s earlier versions, WebDriver interacts directly with the browser, offering more reliable testing by mimicking a real user’s behavior. It supports multiple browsers, including Chrome, Firefox, Edge, and Safari, and can be used with several programming languages like Java, Python, C#, JavaScript, and Ruby.
Key Features of Selenium WebDriver
Cross-Browser Compatibility Selenium WebDriver supports all major browsers, making it a valuable tool for cross-browser testing. This capability ensures that your web application functions smoothly on different browsers without issues.
Support for Multiple Languages One of Selenium WebDriver’s strengths is its support for numerous programming languages. Whether you are proficient in Java, Python, or C#, WebDriver allows you to write test scripts in the language you’re most comfortable with.
Scalability Selenium WebDriver can be integrated with other tools like Selenium Grid for parallel execution of test scripts, which significantly reduces testing time, especially for large-scale applications.
Direct Browser Interaction WebDriver communicates directly with the browser without using any intermediary, ensuring faster and more accurate testing compared to earlier versions like Selenium RC.
Open-Source Being open-source, Selenium WebDriver is free to use, and it has a thriving community of developers who continuously contribute to its improvement.
Why Selenium WebDriver for Automation Testing?
There are numerous automation testing tools available, but Selenium WebDriver is widely regarded as the go-to solution for several reasons:
Ease of Use: Selenium WebDriver is relatively easy to set up and use, especially if you are familiar with basic programming.
Robustness: Its ability to handle complex testing scenarios, including dynamic elements and AJAX-based applications, makes it a powerful choice.
Integration with CI/CD Pipelines: Selenium integrates seamlessly with continuous integration/continuous deployment (CI/CD) tools like Jenkins, allowing automated tests to be run as part of the deployment process.
Community Support: Selenium’s large community offers extensive resources, tutorials, and plugins that facilitate easier learning and faster troubleshooting.
Setting Up Selenium WebDriver for Testing
To get started with Selenium WebDriver, follow these steps:
Step 1: Install WebDriver for the Desired Browser
First, you need to install the WebDriver specific to the browser you intend to automate. For instance:
ChromeDriver for Chrome: Download it from the official Selenium site.
GeckoDriver for Firefox: Available from Mozilla’s repository.
bash
Copy code
# Example for ChromeDriver installation in JavaScript
npm install selenium-webdriver
Step 2: Configure the Development Environment
Once you have the WebDriver downloaded, set up the programming environment. For example, in Java, you would create a new Maven or Gradle project and include Selenium dependencies:
xml
Copy code
<dependency>
<groupId>org.seleniumhq.selenium</groupId>
<artifactId>selenium-java</artifactId>
<version>4.0.0</version>
</dependency>
Step 3: Writing Test Scripts
The next step is to write test scripts that interact with the application under test. In this example, we’ll use Java to automate a simple login page test:
java
Copy code
import org.openqa.selenium.WebDriver;
import org.openqa.selenium.chrome.ChromeDriver;
public class LoginTest {
public static void main(String[] args) {
// Set the path of the ChromeDriver
System.setProperty("webdriver.chrome.driver", "path/to/chromedriver");
WebDriver driver = new ChromeDriver();
driver.get("https://example.com/login");
// Find the username and password fields
driver.findElement(By.id("username")).sendKeys("testuser");
driver.findElement(By.id("password")).sendKeys("password123");
// Submit the login form
driver.findElement(By.id("loginButton")).click();
// Check if login was successful
String expectedUrl = "https://example.com/dashboard";
if(driver.getCurrentUrl().equals(expectedUrl)){
System.out.println("Login Successful");
} else {
System.out.println("Login Failed");
}
driver.quit();
}
}
Step 4: Running the Tests
After writing the script, execute the test to see whether the application functions as expected. Selenium WebDriver automatically launches the browser, performs the actions defined in the script, and then closes the browser.
Step 5: Generating Test Reports
You can integrate test reporting tools like TestNG or JUnit to generate detailed reports that offer insights into pass/fail status, execution times, and any errors encountered.
Best Practices for Selenium WebDriver Automation Testing
1. Use Explicit Waits Over Implicit Waits
When testing dynamic web applications, using explicit waits is crucial for ensuring that your test script waits for a specific condition to be met before proceeding. This is much more reliable than implicit waits, which may cause unnecessary delays.
java
Copy code
WebDriverWait wait = new WebDriverWait(driver, 10);
wait.until(ExpectedConditions.visibilityOfElementLocated(By.id("elementID")));
2. Modularize Your Code
Keep your test scripts clean and maintainable by dividing your code into modules. Use Page Object Model (POM) to separate the logic of the test from the UI elements.
3. Perform Cross-Browser Testing
One of the key strengths of Selenium WebDriver is its support for cross-browser testing. Always verify your application across multiple browsers to ensure consistent behavior.
4. Run Tests in Parallel
Utilize Selenium Grid to run multiple tests in parallel across different browsers and environments. This approach saves time, especially when dealing with large-scale applications.
5. Integrate with CI/CD Tools
Integrating Selenium WebDriver tests with CI/CD tools like Jenkins or GitLab ensures that your test scripts are automatically executed with every code commit, allowing for continuous testing and faster releases.
Challenges in Selenium WebDriver Testing
Although Selenium WebDriver is a powerful tool, it comes with certain challenges:
Handling Dynamic Elements: Web elements that frequently change their IDs or classes can make testing difficult. In such cases, use XPath or CSS selectors to locate elements more reliably.
Pop-up Windows and Alerts: Selenium can handle browser alerts, but handling multiple pop-ups or system-level alerts may require additional handling.
Captchas and Two-Factor Authentication: Automated testing cannot bypass captchas or two-factor authentication, and you’ll need to collaborate with developers to create a test environment with these features disabled.
Conclusion
Mastering Selenium WebDriver Automation Testing can significantly improve the speed, accuracy, and efficiency of your web application testing efforts. With its cross-browser capabilities, support for multiple languages, and integration with CI/CD pipelines, it is the ideal choice for modern software testing. Following best practices and understanding the challenges that come with automation will set you on the path to becoming a Selenium WebDriver expert.
0 notes
Text
HTML Graphics

HTML provides various ways to include and work with graphics directly on web pages. The most common methods include using Canvas, SVG, and other techniques like CSS and WebGL for advanced graphics.
1. Canvas (<canvas>)
Purpose: The <canvas> element is a container for graphics that can be drawn using JavaScript. It's ideal for drawing shapes, making animations, creating charts, and developing games.
How It Works: The <canvas> element itself is just a container; the drawing is done with JavaScript, using a 2D or 3D context.
Attributes: width, height
Example: Drawing a rectangle on the canvas.<canvas id="myCanvas" width="200" height="100"></canvas><script> var canvas = document.getElementById('myCanvas'); var ctx = canvas.getContext('2d'); ctx.fillStyle = "blue"; ctx.fillRect(10, 10, 150, 80); </script>
Use Cases:
Creating dynamic graphics and animations
Developing browser-based games
Rendering charts and graphs
2. SVG (Scalable Vector Graphics) (<svg>)
Purpose: The <svg> element is used to define vector-based graphics that can be scaled without losing quality. SVG is XML-based, which means each element is accessible and can be manipulated via CSS and JavaScript.
How It Works: SVG graphics are defined in XML format, which makes them easy to edit and manipulate.
Example: Creating a simple circle with SVG.<svg width="100" height="100"> <circle cx="50" cy="50" r="40" stroke="black" stroke-width="3" fill="red" /> </svg>
Use Cases:
Icons and logos that need to be scalable
Creating complex vector illustrations
Responsive designs where graphics need to scale
3. CSS for Graphics
Purpose: CSS can be used to create and manipulate graphics through styles like gradients, shadows, and transformations.
How It Works: By using properties like background-image, border-radius, box-shadow, and transform, you can create graphic effects directly in CSS without using images.
Example: Creating a gradient background with CSS.<div style="width: 200px; height: 100px; background: linear-gradient(to right, red, yellow);"> </div>
Use Cases:
Adding simple graphical effects like gradients or shadows
Creating animations using keyframes
Designing layouts with complex shapes
4. WebGL
Purpose: WebGL (Web Graphics Library) is a JavaScript API for rendering 3D graphics within a web browser without the use of plugins.
How It Works: WebGL is based on OpenGL ES and provides a way to create complex 3D graphics and animations directly in the browser.
Example: WebGL is more complex and typically requires a JavaScript library like Three.js to simplify development.<!-- This is a simplified example, WebGL requires more setup --> <canvas id="glCanvas" width="640" height="480"></canvas> <script src="https://cdnjs.cloudflare.com/ajax/libs/three.js/r128/three.min.js"></script> <script> var scene = new THREE.Scene(); var camera = new THREE.PerspectiveCamera(75, window.innerWidth/window.innerHeight, 0.1, 1000); var renderer = new THREE.WebGLRenderer({ canvas: document.getElementById('glCanvas') }); renderer.setSize(window.innerWidth, window.innerHeight); document.body.appendChild(renderer.domElement); var geometry = new THREE.BoxGeometry(); var material = new THREE.MeshBasicMaterial({ color: 0x00ff00 }); var cube = new THREE.Mesh(geometry, material); scene.add(cube); camera.position.z = 5; var animate = function () { requestAnimationFrame(animate); cube.rotation.x += 0.01; cube.rotation.y += 0.01; renderer.render(scene, camera); }; animate(); </script>
Use Cases:
Creating complex 3D visualizations
Developing 3D games and simulations
Creating immersive virtual reality experiences
5. Inline SVG vs. <img> with SVG
Inline SVG: Directly embeds SVG code into the HTML, allowing for CSS and JavaScript manipulation.
<svg width="100" height="100"> <rect width="100" height="100" style="fill:blue" /> </svg>
<img> with SVG: Embeds an SVG file as an image, which is more static and less interactive.
<img src="image.svg" alt="Description">
Choosing the Right Method
Use <canvas> for dynamic, scriptable graphics.
Use <svg> for scalable, static graphics or when you need fine control over vector elements.
Use WebGL for 3D graphics and complex rendering tasks.
Use CSS for simple shapes, gradients, and animations.
These HTML5 graphics tools enable a wide range of visual possibilities, from simple shapes and icons to complex animations and 3D environments.
Read Me…
0 notes
Text
web development,
web development,
Web development has come a long way since the early days of static HTML pages. From simple text-based sites to dynamic, interactive web applications, the field has evolved rapidly. This article explores the history, current trends, and future directions of web development, providing insights for both seasoned developers and those new to the field.
A Brief History of Web Development The Early Days The World Wide Web was born in 1989 when Tim Berners-Lee, a British scientist, invented the first web browser and web server. Early websites were primarily static, consisting of simple HTML pages with text and images. These pages were linked together by hyperlinks, allowing users to navigate from one page to another.
The Rise of Dynamic Websites In the mid-1990s, the introduction of server-side scripting languages like Perl, PHP, and ASP allowed for the creation of dynamic websites. These technologies enabled websites to interact with databases, making it possible to generate content on the fly based on user input. This marked a significant shift from static to dynamic content, paving the way for more interactive and personalized web experiences.
The Advent of Web 2.0 The early 2000s saw the emergence of Web 2.0, characterized by user-generated content, social media, and interactive web applications. Technologies like AJAX (Asynchronous JavaScript and XML) allowed for smoother, more responsive user experiences by enabling asynchronous data loading without reloading the entire page. This era also witnessed the rise of content management systems (CMS) like WordPress, making web development more accessible to non-developers.
Current Trends in Web Development JavaScript Frameworks and Libraries JavaScript has become the backbone of modern web development, thanks to powerful frameworks and libraries like React, Angular, and Vue.js. These tools streamline the development process by providing reusable components and efficient state management, allowing developers to build complex web applications with ease.
Progressive Web Apps (PWAs) Progressive Web Apps (PWAs) combine the best of web and mobile apps, offering offline capabilities, push notifications, and a seamless user experience across different devices. PWAs are gaining popularity due to their ability to provide a native-like experience without the need for app store distribution.
Single Page Applications (SPAs) Single Page Applications (SPAs) load a single HTML page and dynamically update content as the user interacts with the app. This approach reduces page load times and provides a smoother user experience. Popular frameworks like React and Angular are commonly used to build SPAs.
Serverless Architecture Serverless architecture is revolutionizing the way web applications are built and deployed. By abstracting away server management, developers can focus on writing code while cloud providers handle infrastructure. Services like AWS Lambda and Azure Functions enable developers to build scalable applications with reduced operational overhead.
WebAssembly WebAssembly (Wasm) is a binary instruction format that allows code written in languages like C, C++, and Rust to run on the web at near-native speed. This opens up new possibilities for web development, including performance-intensive applications like video editing, gaming, and scientific simulations.
The Future of Web Development Artificial Intelligence and Machine Learning Artificial Intelligence (AI) and Machine Learning (ML) are poised to play a significant role in the future of web development. AI-powered chatbots, personalized content recommendations, and advanced data analytics are just a few examples of how these technologies can enhance user experiences and drive business growth.
The Internet of Things (IoT) The Internet of Things (IoT) is expanding the scope of web development beyond traditional screens. Web developers will increasingly need to create interfaces and APIs that enable communication between various IoT devices, from smart home appliances to industrial sensors.
Augmented Reality (AR) and Virtual Reality (VR) AR and VR technologies are set to transform web experiences by creating immersive, interactive environments. WebXR, a JavaScript API for accessing AR and VR devices, is enabling developers to build rich, 3D web applications that go beyond traditional 2D interfaces.
Enhanced Security Measures As cyber threats continue to evolve, web developers must prioritize security. Future web development will likely see increased adoption of advanced security practices, such as multi-factor authentication, end-to-end encryption, and AI-driven threat detection, to protect user data and ensure privacy.
Conclusion Web development is a dynamic and ever-evolving field, driven by technological advancements and changing user expectations. By staying informed about current trends and future directions, developers can continue to create innovative, engaging, and secure web experiences. As the web continues to evolve, the possibilities for what can be achieved are limited only by our imagination.
0 notes
Text
JavaScript Mastery: Unlocking the Power of The Definitive Guide

JavaScript stands as the cornerstone of modern web development, empowering developers to create interactive and dynamic experiences on the web. For those looking to delve deep into JavaScript's intricacies and master its capabilities, "JavaScript: The Definitive Guide" serves as an indispensable resource. Authored by David Flanagan, this comprehensive guide is revered for its depth, clarity, and practical insights into JavaScript programming. This article explores how "JavaScript Mastery" can transform your understanding and proficiency in JavaScript development.
Introduction to JavaScript: Foundation of Web Interactivity
JavaScript, often abbreviated as JS, was initially developed to add interactivity to static web pages. Over the years, it has evolved into a versatile language capable of handling complex tasks ranging from client-side scripting to server-side development. Understanding JavaScript's syntax, features, and best practices is crucial for anyone aspiring to excel in web development.
Why Choose "JavaScript: The Definitive Guide"?
Comprehensive Coverage of JavaScript
"JavaScript: The Definitive Guide" is renowned for its comprehensive coverage of the JavaScript language and ecosystem. The book spans from fundamental concepts like variables, data types, and control structures to advanced topics such as functional programming, asynchronous programming with promises, and modern ES6+ features. Each chapter is meticulously crafted to provide a deep dive into JavaScript's capabilities while ensuring clarity and accessibility.
Authoritative and Trusted Source
David Flanagan, the author of "JavaScript: The Definitive Guide," brings years of experience and expertise to the table. As a seasoned programmer and prolific writer, Flanagan distills complex topics into digestible explanations, making the guide suitable for both beginners and seasoned developers seeking to deepen their understanding of JavaScript.
Navigating Through "JavaScript: The Definitive Guide"
Foundational Concepts and Syntax
The guide begins with foundational JavaScript concepts, ensuring readers grasp essential syntax and programming principles. Topics such as variables, operators, functions, and control flow are explained in detail, laying a solid groundwork for more advanced discussions.
Object-Oriented Programming (OOP) in JavaScript
JavaScript's flexible nature allows developers to employ object-oriented programming paradigms effectively. Flanagan explores how JavaScript supports OOP through prototypes, constructors, inheritance, and object composition. These concepts are crucial for structuring scalable and maintainable JavaScript applications.
Modern JavaScript: ES6+ Features
"JavaScript: The Definitive Guide" doesn't just cover the basics; it dives into modern JavaScript features introduced in ECMAScript 6 (ES6) and beyond. Readers learn about arrow functions, template literals, destructuring, classes, modules, and other enhancements that streamline code readability and maintainability.
Practical Application: Projects and Exercises
Hands-On Learning Approach
One of the strengths of "JavaScript: The Definitive Guide" is its hands-on approach to learning. The book includes numerous examples, projects, and coding exercises that reinforce theoretical concepts. Readers are encouraged to apply what they've learned to real-world scenarios, honing their problem-solving skills and gaining confidence in JavaScript development.
Building Interactive Web Applications
From manipulating the DOM (Document Object Model) to handling user events and implementing AJAX (Asynchronous JavaScript and XML) for dynamic content loading, the guide equips developers with the skills needed to build responsive and interactive web applications.
Advancing Your Skills: Beyond the Basics
Performance Optimization and Best Practices
"JavaScript: The Definitive Guide" goes beyond syntax and features to address performance optimization techniques and best practices. Readers learn how to write efficient JavaScript code, avoid common pitfalls, and leverage browser tools for debugging and profiling.
Integrating JavaScript with Other Technologies
JavaScript's versatility extends beyond web browsers. The guide explores how JavaScript can be integrated with backend technologies through frameworks like. Readers gain insights into server-side JavaScript development, asynchronous programming patterns, and building RESTful APIs.
Community and Resources
Support and Collaboration
Learning JavaScript is a journey that's greatly enhanced by community support and collaboration. "JavaScript: The Definitive Guide" connects readers with a vibrant community of learners, developers, and experts. Online forums, tutorials, and additional resources complement the book's content, providing avenues for further learning and growth.
Staying Updated with Evolving Standards
JavaScript is a rapidly evolving language with new features and updates introduced regularly. "JavaScript: The Definitive Guide" helps readers stay abreast of these changes by emphasizing core concepts and principles that transcend specific language versions.
Conclusion
In conclusion, "JavaScript: The Definitive Guide" serves as more than just a reference book; it is a pathway to mastering JavaScript and unlocking its full potential in web development. David Flanagan's expertise and comprehensive approach make this guide indispensable for anyone serious about advancing their JavaScript skills. Whether you're starting your journey as a web developer or aiming to deepen your understanding of JavaScript's nuances, "JavaScript Mastery" offers a roadmap to proficiency and innovation in web development.
0 notes
Text
ORACLE APEX WEBSOCKETS

Unlocking Real-Time Communication in Oracle APEX with WebSockets
Oracle Application Express (APEX) is a powerful low-code development framework that lets you build robust web applications on top of an Oracle database, But in today’s world of instant updates and dynamic web experiences, traditional polling methods for data exchange can feel sluggish. That’s where WebSockets shine.
What are WebSockets?
WebSockets are a communication protocol that provides a persistent, full-duplex connection between a web browser and a server. This means:
Bidirectional Communication: Unlike HTTP, where the client initiates requests, both the server and client can send data at any time.
Real-time Updates: Changes are pushed to the client without the need for constant polling.
Low Overhead: WebSockets reduce the overhead compared to repeated HTTP requests, making them efficient for frequent updates.
Why WebSockets in Oracle APEX?
Here are some compelling use cases for WebSockets in your APEX applications:
Real-time Data Dashboards: Update charts, graphs, and visualizations instantly as your database changes, without requiring page refreshes.
Live Collaboration: Build features like shared whiteboards, where changes made by one user are instantly visible to others.
Chat Systems: Implement robust chat applications for real-time communication among users.
Progress Indicators: Provide fine-grained progress bars for long-running processes, updating in real-time.
Notifications: Send timely alerts and notifications to users without manual refreshes.
How to Implement WebSockets in Oracle APEX
While APEX doesn’t have a built-in WebSocket server, there are a couple of ways to integrate WebSockets:
Oracle REST Data Services (ORDS) with WebSockets: ORDS offers experimental WebSocket support. You’ll need to configure this on the ORDS side and use JavaScript on the APEX front-end to manage the WebSocket connection.
External WebSocket Server: Utilize a dedicated WebSocket server (like a Node.js server with Socket.io) for flexibility. Your APEX application can interact with it using PL/SQL and AJAX to send and receive messages.
Example: Creating a Simple APEX Chat with WebSockets
Let’s outline the steps involved in using an external WebSocket server for a chat application:
Set up a WebSocket Server: You’d create a Node.js server using a library like Socket.io to handle WebSocket connections and broadcast messages.
APEX Front-end: Design your chat interface in APEX with a text input and a message display area. Use JavaScript to establish the WebSocket connection and handle message sending and receiving.
APEX Back-end: Create PL/SQL procedures to interact with the WebSocket server (likely using APEX_WEB_SERVICE to make calls to the Node.js server)
Important Considerations
Security: Properly secure your WebSocket endpoints like any other web service to prevent unauthorized access.
Scalability If you’re expecting a large number of concurrent connections, consider how you’ll scale your WebSocket server.
youtube
You can find more information about Oracle Apex in this Oracle Apex Link
Conclusion:
Unogeeks is the No.1 IT Training Institute for Oracle Apex Training. Anyone Disagree? Please drop in a comment
You can check out our other latest blogs on Oracle Apex here – Oarcle Apex Blogs
You can check out our Best In Class Oracle Apex Details here – Oracle Apex Training
Follow & Connect with us:
———————————-
For Training inquiries:
Call/Whatsapp: +91 73960 33555
Mail us at: [email protected]
Our Website ➜ https://unogeeks.com
Follow us:
Instagram: https://www.instagram.com/unogeeks
Facebook: https://www.facebook.com/UnogeeksSoftwareTrainingInstitute
Twitter: https://twitter.com/unogeeks
0 notes
Text
ORACLE APEX JQUERY

Harnessing the Power of jQuery in Oracle APEX
Oracle Application Express (APEX) is a powerful low-code development environment that lets you create robust web applications with minimal effort. Adding jQuery to the mix unlocks even greater flexibility and dynamism in your APEX projects. This blog will cover why you should consider jQuery for APEX, how to integrate it, and practical examples.
Why jQuery + APEX?
Simplified DOM Manipulation: jQuery drastically simplifies selecting and modifying elements within your HTML pages (the Document Object Model, or DOM). This makes it more accessible to change content, alter styles, and create responsive layouts.
Robust Event Handling: Handling user interactions (clicks, form submissions, etc.) becomes much more streamlined with jQuery. You can write concise, readable code to trigger actions and dynamic responses.
Effortless AJAX: Need to fetch data from the server without reloading the entire page? jQuery makes AJAX calls a breeze, improving the user experience.
Animation and Effects: jQuery’s rich library of animations and effects lets you add visual flair and engaging transitions for a more polished web application.
Vast Plugin Ecosystem: Since jQuery is incredibly popular, there’s a massive collection of pre-built plugins for almost any functionality you can imagine – date pickers, rich text editors, charts, and more!
Integrating jQuery
APEX already includes jQuery, making integration a snap:
Reference the Library: In your APEX page’s attributes, add a reference to the included jQuery library under the’ JavaScript’ section.
Write jQuery Code: You can add it directly within tags on the page or include it as a separate JavaScript file for better organization.
Practical Examples
Let’s see some jQuery in action within an APEX environment:
Button Click to Show/Hide Content
JavaScript
$(document).ready(function() {
$(“#myButton”).click(function() {
$(“#hiddenContent”).toggle();
});
});
Use code with caution.
content_copy
Dynamic Form Validation
JavaScript
$(document).ready(function() {
$(“#myForm”).submit(function(event) {
if ($(“#nameField”).val() === “”) {
alert(“Please enter your name”);
event.preventDefault(); // Stop the form from submitting
}
});
});
Use code with caution.
content_copy
AJAX Data Loading
JavaScript
$(document).ready(function() {
$(“#loadDataButton”).click(function() {
$.ajax({
url: “get_customer_data.php,”
success: function(data) {
$(“#resultsDiv”).html(data);
}
});
});
});
Use code with caution.
content_copy
Important Considerations
jQuery Version: Check the jQuery version APEX uses. It might only sometimes be the very latest. Consider using jQuery Migrate for compatibility if needed.
APEX Dynamic Actions: APEX has built-in Dynamic Actions. Dynamic Actions could be simpler than writing jQuery code if simple interactions are needed.
Unlock Enhanced User Experiences
jQuery and Oracle APEX make a powerful team. Understanding how to integrate jQuery into your APEX projects gives you the tools to create more dynamic, user-friendly web applications.
youtube
You can find more information about Oracle Apex in this Oracle Apex Link
Conclusion:
Unogeeks is the No.1 IT Training Institute for Oracle Apex Training. Anyone Disagree? Please drop in a comment
You can check out our other latest blogs on Oracle Apex here – Oarcle Apex Blogs
You can check out our Best In Class Oracle Apex Details here – Oracle Apex Training
Follow & Connect with us:
———————————-
For Training inquiries:
Call/Whatsapp: +91 73960 33555
Mail us at: [email protected]
Our Website ➜ https://unogeeks.com
Follow us:
Instagram: https://www.instagram.com/unogeeks
Facebook: https://www.facebook.com/UnogeeksSoftwareTrainingInstitute
Twitter: https://twitter.com/unogeeks
0 notes
Text
it course in chennai
How do I connect an HTML web page to a database?
Connecting an HTML web page to a database typically involves using server-side technologies to handle database interactions. HTML alone cannot directly interact with databases; you need a programming language on the server side to handle the communication. Here is a basic outline of the steps involved:
Choose a Server-Side Language:
You need a server-side scripting language to interact with the database. Common choices include PHP, Node.js, Python (Django or Flask), Ruby on Rails, etc. Choose the language that you are comfortable with or that fits your project requirements.
Set Up a Database:
You need a database to store and retrieve data. Common databases include MySQL, PostgreSQL, MongoDB, etc. Install and configure the database server according to your chosen technology.
Create a Database Connection:
In your server-side code, establish a connection to the database using the appropriate library or module for your chosen language. This usually involves providing connection details such as database host, username, password, and database name.
Write Server-Side Code:
Create server-side code to handle database operations. This includes handling user requests, querying the database, and sending the results back to the client. For example, if you’re using PHP, you might use the MySQLi or PDO extension to interact with a MySQL database.
Example (PHP with MySQLi):
php
Copy code
<?php
$servername = “your_database_host”;
$username = “your_username”;
$password = “your_password”;
$dbname = “your_database_name”;
// Create connection
$conn = new mysqli($servername, $username, $password, $dbname);
// Check connection
if ($conn->connect_error) {
die(“Connection failed: “ . $conn->connect_error);
}
// Perform database operations here…
// Close connection
$conn->close();
?>
Handle HTML Form Submissions:
If your web page involves user input, create HTML forms that submit data to the server. Use JavaScript or other technologies to enhance user interactions if needed.
Send Data Between Frontend and Backend:
Use AJAX or other methods to send data between the HTML page (frontend) and the server-side code (backend). This allows dynamic updates without reloading the entire page.
Remember, security is crucial when dealing with databases. Use parameterized queries or prepared statements to prevent SQL injection attacks, validate user input, and implement proper authentication and authorization mechanisms.
It course in chennai
It institute in chennai
it coaching centre in chennai
best it course institute in chennai
it training institute in chennai with placement
it course institute in chennai
It courses in chennai
best it institute in chennai
top it training institute in chennai
Software training institute in chennai

0 notes
Text
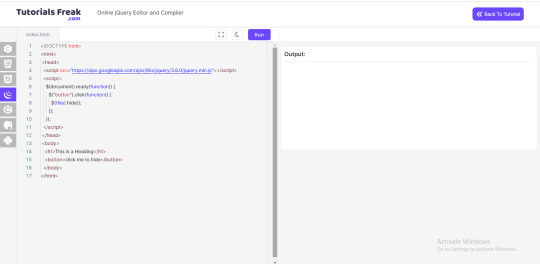
A Beginner's Guide: How to Use jQuery for Web Development
jQuery is a powerful and versatile JavaScript library that simplifies and enhances web development. Whether you're building a personal website, creating a dynamic user interface, or adding interactive elements to your projects, jQuery can be an invaluable tool. In this beginner's guide, we'll walk you through the basics of using jQuery and how you can get started with it, including the use of an Online jQuery Editor or jQuery Online Compiler.
Understanding the Basics of jQuery
Before diving into jQuery, it's essential to have a fundamental understanding of HTML, CSS, and JavaScript. jQuery is a JavaScript library, and having a solid grasp of these foundational web technologies will make learning jQuery much more manageable.
Getting Started with jQuery
Here are the steps to get started with jQuery:
Include jQuery: To use jQuery, you first need to include the jQuery library in your HTML document. You can do this by adding a link to the jQuery library hosted on a Content Delivery Network (CDN) or by downloading the library and linking to it locally.
html
<script src="https://code.jquery.com/jquery-3.6.0.min.js"></script>
Create a jQuery Script: You typically include your jQuery code inside a tag in your HTML document. To ensure your code executes after the page has loaded, you can wrap it in a document ready function:
javascript
$(document).ready(function() { // Your jQuery code goes here });
Selecting Elements: One of the fundamental aspects of jQuery is selecting HTML elements and manipulating them. You can select elements by their HTML tag, class, or ID. For example:
Select all elements: $("p")
Select elements with a specific class: $(".classname")
Select an element by its ID: $("#elementID")
Performing Actions: Once you've selected an element, you can perform actions on it. Common actions include:
Changing the content: $(element).text("New text")
Changing the style: $(element).css("property", "value")
Adding or removing classes: $(element).addClass("classname"), $(element).removeClass("classname")
Handling Events: jQuery simplifies event handling. You can use functions like .click(), .hover(), or .submit() to define what happens when a user interacts with an element.
Animations: jQuery provides easy-to-use animation functions, such as .fadeIn(), .fadeOut(), and .slideDown(), to create dynamic effects on your website.
Ajax: jQuery simplifies making asynchronous requests to a web server using the .ajax() function, allowing you to retrieve or send data without requiring a page refresh.
Practicing with an Online jQuery Editor
To practice jQuery, you can use an Online jQuery Editor or jQuery Online Compiler. These web-based platforms offer a convenient way to write, test, and experiment with jQuery code in real time. You can access them from any device with an internet connection and a web browser, making them accessible and beginner-friendly.
Additional Resources for Learning jQuery
jQuery Documentation: The official jQuery documentation is an excellent resource for in-depth learning. It provides comprehensive information about jQuery functions, methods, and examples.
Online Tutorials: Many online tutorials and courses are designed to help beginners learn jQuery step by step. These tutorials often include hands-on exercises and projects.
Books: Consider reading books dedicated to jQuery, such as "jQuery in Action" or "Learning jQuery" to gain a deeper understanding of the library.
Conclusion
jQuery is a versatile and accessible tool for beginners and experienced developers alike. With an understanding of the basics, practice, and access to an Online jQuery Editor or jQuery Online Compiler, you can start creating dynamic, interactive web content. Don't hesitate to explore tutorials, documentation, and additional resources to further develop your jQuery skills and bring your web projects to life.
Happy coding!
0 notes
Text
The Role of Automation Applications in Modern Web Development: Driving Efficiency and Innovation
In the fast-paced world of technology, automation has become a cornerstone of modern web development, enabling businesses to streamline processes, reduce costs, and enhance user experiences. Automation applications, powered by advanced web technologies, are transforming industries by handling repetitive tasks, optimizing workflows, and enabling data-driven decision-making. From backend scripting to frontend interactivity, the integration of automation into web development is reshaping how applications are built, deployed, and maintained. This article explores the pivotal role of automation in web development, highlighting key technologies, trends, and their impact on the digital landscape.
At the heart of automation in web development is the ability to eliminate manual effort and reduce human error. Server-side scripting languages like Python, Node.js, and Ruby on Rails are commonly used to automate tasks such as data processing, report generation, and system monitoring. For example, an e-commerce platform can use cron jobs to automatically update inventory levels, generate sales reports, and send email notifications to customers. Similarly, webhooks enable real-time automation by triggering actions in response to specific events, such as processing a payment or updating a database. These automated workflows not only save time but also improve accuracy, ensuring that systems run smoothly and efficiently.
The rise of APIs (Application Programming Interfaces) has further expanded the possibilities of automation in web development. APIs allow different systems and applications to communicate with each other, enabling seamless integration and data exchange. For instance, a CRM system can integrate with an email marketing platform via an API, automatically syncing customer data and triggering personalized email campaigns based on user behavior. Payment gateway APIs, such as those provided by Stripe or PayPal, automate the processing of online transactions, reducing the need for manual invoicing and reconciliation. By leveraging APIs, developers can create interconnected ecosystems that operate efficiently and cohesively.
Frontend automation is another area where web development is driving innovation. Modern JavaScript frameworks like React, Angular, and Vue.js enable developers to build dynamic, interactive web applications that respond to user inputs in real-time. Features like form autofill, input validation, and dynamic content loading automate routine tasks, enhancing the user experience and reducing the burden on users. For example, an online booking system can use AJAX (Asynchronous JavaScript and XML) to automatically update available time slots as users select dates, eliminating the need for page reloads and providing a smoother experience. These frontend automation techniques not only improve usability but also increase user engagement and satisfaction.
The integration of artificial intelligence (AI) and machine learning (ML) into web development has taken automation to new heights. AI-powered tools can automate complex decision-making processes and deliver personalized experiences at scale. For instance, an e-commerce website can use recommendation engines to analyze user behavior and suggest products tailored to individual preferences. Similarly, chatbots powered by natural language processing (NLP) can handle customer inquiries, provide support, and even process orders, reducing the workload on human agents. These technologies not only enhance efficiency but also enable businesses to deliver more value to their customers.
DevOps practices have also been revolutionized by automation, particularly in the context of continuous integration and continuous deployment (CI/CD). CI/CD pipelines automate the testing, integration, and deployment of code updates, ensuring that new features and bug fixes are delivered to users quickly and reliably. Tools like Jenkins, GitLab CI, and GitHub Actions enable developers to automate these processes, reducing the risk of human error and accelerating the development lifecycle. Additionally, containerization technologies like Docker and orchestration platforms like Kubernetes automate the deployment and scaling of applications, ensuring optimal performance even during peak usage periods.
Security is another critical area where automation is making a significant impact. Automated security tools can monitor web applications for vulnerabilities, detect suspicious activities, and respond to threats in real-time. For example, web application firewalls (WAFs) can automatically block malicious traffic, while SSL/TLS certificates can be automatically renewed to ensure secure communication. Additionally, automated penetration testing tools can identify potential security weaknesses, allowing developers to address them before they can be exploited. These automated security measures not only protect sensitive data but also help businesses comply with regulatory requirements and build trust with their users.
In conclusion, automation is transforming web development by enabling businesses to operate more efficiently, deliver better user experiences, and stay ahead in a competitive market. From backend scripting and API integration to frontend interactivity and AI-driven decision-making, automation is reshaping how applications are built and maintained. As web technologies continue to evolve, the potential for automation will only grow, paving the way for smarter, more responsive, and more secure digital ecosystems. By embracing automation, developers can unlock new levels of efficiency and innovation, driving progress and success in the digital age.
Make order from us: @Heldbcm
Our portfolio: https://www.linkedin.com/company/chimeraflow
0 notes